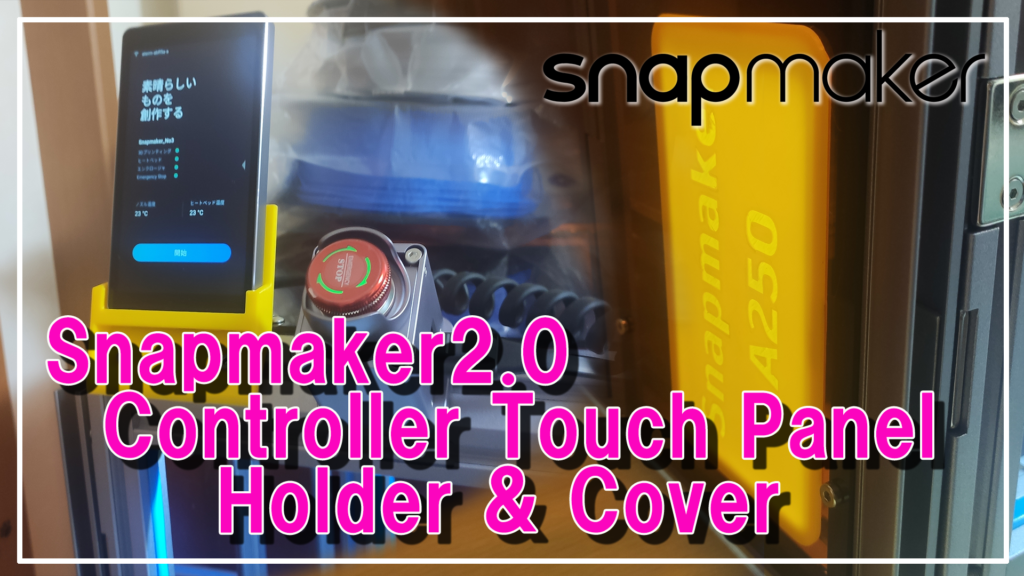
Snapmaker2.0 Controller Touch Panel Holder & Cover
こんにちは、ゴンタです。
久しぶりにSnapmakerの話題を取り上げたいと思います。
 我が家にはSnapmaker2.0 A250 エンクロージャーを現在3台保有しています。
1台はCNC加工とレーザー10W加工、ロータリーモジュールの組み合わせで使用しており、2台は3Dプリンタ専用機でABS樹脂用とPETG・TPU・PLA樹脂用として使い分けています。
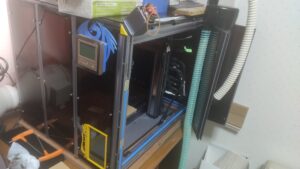
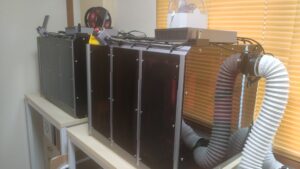
3Dプリンタ用のA250は横向きに2台並べて設置しているのですが、場所があまりないので2台が接近してしまっているのでエンクロージャーの正面にあるコントローラータッチパネルの操作が非常にやりにくい状態でした。
 高さ調整や成型開始など操作をするたびにタッチパネルを手に持ち替え操作するといった手間がかかり、成型稼働中はタッチパネルに表示される進捗度合いを覗き込んで確認するといった具合で、とても面倒な状態でした。
Snapmaker2.0 A250 エンクロージャーは横向きにしているため正面のタッチパネルは余り使い勝手が良いとは言えないのかもしれません。
誰かがエンクロージャーの上部にコントローラーを設置するホルダーぐらい作ってるものだと思い、Thingiverseを覗いてみましたが意外にも誰も作成し、公開していないようなので自分で作ってしまえということで、コントローラタッチパネルホルダーを作成しました。
注意事項
日本語から英語に翻訳していますが、機械翻訳DeepLを使用し翻訳しています。
日本語独特の言い回しや言葉の意味がうまく翻訳できていない場合がありますので、前後の文章から読み取っていただきか、日本語を他の機械翻訳を通してみてください。
Hello, this is Gonta.
It has been a while since I have discussed the topic of Snapmaker.
We currently have three Snapmaker 2.0 A250 enclosures in our house.
One is used for a combination of CNC machining, laser 10W machining, and rotary module, and two are dedicated machines for 3D printers, one for ABS resin and the other for PETG/TPU/PLA resin.
The two A250s for the 3D printer are installed side by side, but because there is not much space, the two machines are close together, making it very difficult to operate the controller touch panel in the front of the enclosure.
Each time we needed to adjust the height or start molding, we had to change the touch panel in our hands, and while molding was in progress, we had to check the progress displayed on the touch panel, which was very cumbersome.
Since the Snapmaker2.0 A250 enclosure is set horizontally, the front touch panel may not be so easy to use.
I looked on Thingiverse to see if anyone had made a controller holder for the top of the enclosure, but surprisingly no one had, so I decided to make one myself and created a controller touch panel holder.
Notes.
The translation from Japanese to English is done using machine translation (DeepL).
Please read the text before and after the translation or try another machine translation of the Japanese text.
エンクロージャーの上部にホルダーを設置するにあたって
エンクロージャーをお持ちの方はSnapmaker2.0用非常停止ボタンを設置している人も多いかと思います。
エンクロージャーの上部フレーム部分(45度スロット溝)に非常停止ボタンをM4スロットキーを差し込みネジ止めしていますが、非常停止ボタンの付属品にあるM4スロットキーの予備が2個あるため、このM4スロットキーを使ってコントローラータッチパネルのホルダーを設置することにしました。
 このコントローラータッチパネルのホルダーを設置する場合に必要なものとしては下記のものを準備する必要があります。
- M4ネジスロットキー 2個
- M4ネジ10㎜~12㎜
- USB-TypeC to TypeC 延長ケーブル1m~2m
エンクロージャーの上部フレームに設置するため、Snapmaker2.0のコントローラーユニットのUSB-Cからコントローラータッチパネルまでのケーブルが短いので延長ケーブルが必要となります。
このUSB-C延長ケーブルについても説明したいと思います。
Many of you who have an enclosure have installed an emergency stop button for Snapmaker 2.0.
The emergency stop button is inserted and screwed to the upper frame portion of the enclosure (45-degree slot groove) with an M4 slot key, but since there are two spare M4 slot keys that come with the emergency stop button, we decided to install a controller touch panel holder using this M4 slot key I decided to use this M4 slot key to install a controller touch panel holder.
To install this controller touch panel holder, the following items must be prepared
M4 threaded slot key (2 pcs)
M4 screw 10mm~12mm
USB-TypeC to TypeC extension cable 1m~2m
Since the Snapmaker 2.0 is to be installed in the upper frame of the enclosure, an extension cable is required because the cable from the USB-C of the Snapmaker 2.0 controller unit to the controller touch panel is short.
We would like to explain about this USB-C extension cable.
Snapmaker2.0コントローラーユニットのUSB-Cコネクタについて
Snapmaker2.0 A250/A350(Fモデル・Tモデルを含む)のコントローラーのUSB-Cコネクタは少し特殊な状態になっています。
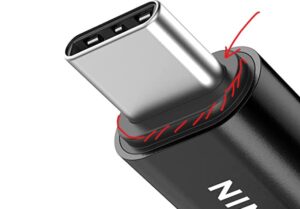
コントローラーのケース厚み分だけUSB-Cコネクタのメス側が1.2㎜ほど中にあるため、USB-Cケーブルのコネクタは規格寸法より1.2㎜長いものが必要になります。
Snapmaker2.0のタッチパネルのUSB-Cオスコネクタの端子長さを測定すると理解しやすいと思います。 他のUSB-Cコネクタより1.2㎜長いので、必然とUSB-Cオスーメス延長ケーブルのオス側コネクタが長いものを準備する必要があります。
”フォーラム等で延長ケーブルを購入したが使えない”といった問題がよく見受けられますが多くは1.2㎜短いため接続端子が配線と繋がっていないために動作しないことがほとんどです。 さらに電源が入るが操作画面が出ないといった問題も電源ピンとアースピンだけが微妙に接触していてデータ線は接続されていないといった原因も端子長さが足りないことが原因です。
USB-Cにはデータ線と電源ピンがありますが、差し込む向き(裏・表)によってもデータ通信ができる場合とできない場合があるケーブルが存在します。
延長ケーブルをAliExpressやAmazonなどで端子長さが長いものを探しましたが、端子の長さを商品詳細スペックとして記載されたUSB-C延長ケーブルは全くありませんでした。 むろん手あたり次第に購入しましたが殆どが標準的な端子長さのためSnapmaker2.0のコントローラーに接続すると簡単に抜けてしまいタッチパネルは通電しません。
 解決策ですがかなり邪道な方法ですが、USB-C延長ケーブルをたくさん買って検証するよりも手っ取り早い方法があります。 AmazonやAliExpressのUSB-C延長ケーブルの商品写真をみて、アルミボディで保護された端子ではなくプラスチックの端子保護になっているもので、端子の根元に1段ゴムのようになったケーブルを探します。
USB-C延長ケーブルのオス端子の根元のゴムまたはプラスチックを1㎜程、クラフトカッターで切除して端子長さを確保するという方法で問題なく接続できるようになりました。
The USB-C connector on the controller of Snapmaker2.0 A250/A350 (including F and T models) is in a slightly special state.
The female side of the USB-C connector is 1.2 mm longer than the standard size because the female side of the USB-C connector is 1.2 mm longer than the standard size by the thickness of the controller’s case. It is easier to understand if you measure the terminal length of the USB-C male connector on the Snapmaker 2.0 touch panel. Since it is 1.2㎜ longer than other USB-C connectors, it is necessary to prepare a USB-C male-to-female extension cable with a longer male connector.
We often see problems such as “I bought an extension cable but it doesn’t work” on forums, but in most cases, it doesn’t work because the connector is 1.2mm too short and the connector is not connected to the wiring. In addition, problems such as power-on but no operation screen, where only the power pin and ground pin are slightly touching but the data line is not connected, are also caused by insufficient terminal length. USB-C has a data line and a power pin, but there are cables that may or may not allow data communication depending on the direction in which they are plugged in (back or front).
I searched AliExpress and Amazon for an extension cable with a longer terminal length, but there were no USB-C extension cables with the terminal length listed as a detailed product specification. Of course, I bought them at random, but most of them were of standard length, so when I connected them to the Snapmaker 2.0 controller, they were easily disconnected and the touch panel would not power on.
The solution is a rather unorthodox one, but there is a quicker way than buying a bunch of USB-C extension cables and trying to verify them. Look at the product photos of USB-C extension cables on Amazon or AliExpress and look for cables that have plastic terminal protection rather than terminals protected by an aluminum body, with one level of rubber at the base of the terminal.
We were able to connect without any problems by cutting about 1 mm of rubber or plastic at the base of the male terminal of the USB-C extension cable with a craft cutter to secure the length of the terminal.
Controller Touch Panel Holderについて
Autodesk Fusion360でタッチパネルホルダを設計しました。 このタッチパネルホルダを使用するにはSnapmaker2.0のA250またはA350](Tモデル・Fモデル含む)純正のエンクロージャーを所有していることが条件になります。
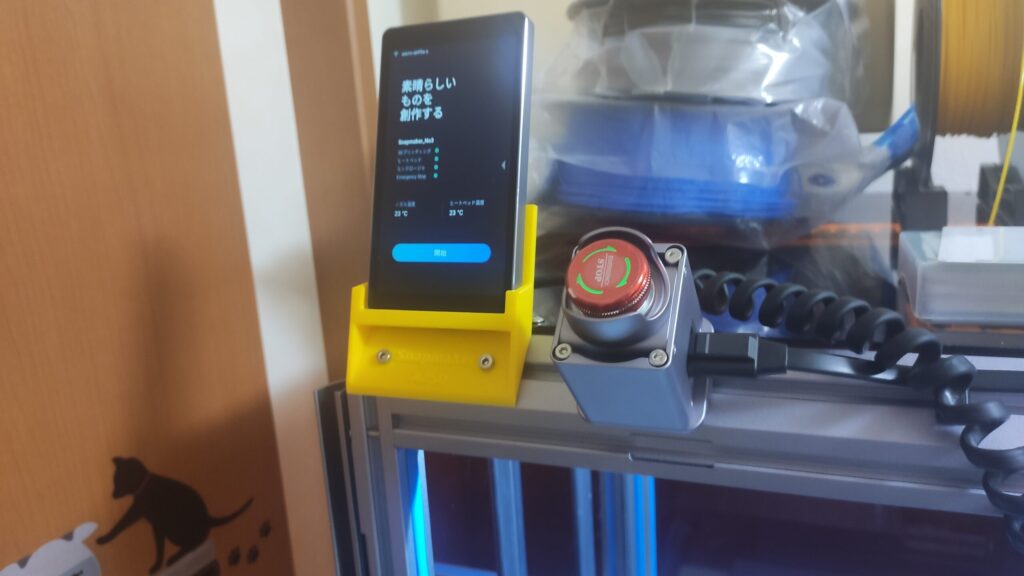
エンクロージャーの正面から見て、右側側面上部のフレームにタッチパネルホルダを設置します。 非常停止ボタンを購入された方は非常停止ボタンの位置を横に移動させて取り付ける形になります。
 3DモデルデータとしてThingiverseの私のアカウントでSTLデータをA250/A3502種類を公開しています。
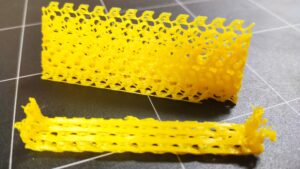
作成方法ですがUltimaker Cura5.0betaを使い、ジャイロイドによるサポートを有効にして水平に置いて成型します。 成型素材ですがPLA樹脂またはABS樹脂どちらでも成型が可能です。 正しい成型方法で行えばネジ穴などの加工も必要がなく、ジャイロイドサポートを剥がすだけで使用することが可能になります。
エンクロージャー上部への取り付けは、Snapmaker2.0 Emergency Button Moduleを購入された方は付属しているM4ネジとM4キースロットナットを使用するとよいでしょう。 M4キースロットネジがない場合はM4ネジに大きめの平ワッシャーを入れ、アルミフレームの溝に入れひっかかるか確認し、M4ナットで固定する方法があります。
 USB-C延長ケーブルですが、長さについてはA250 またはA350のマシンによって変わりますし、エンクロージャーの背面パネルの設置状況によって長さが変わります。
私の場合はA250 3台ともエンクロージャーの背面パネルはSnapmakerのマニュアルに記載された排気口が右下に来るDefaultの位置ではなく、背面パネルを裏表変更して左上に排気口が来るようにしています。 よって、通信ケーブルや電源ケーブルなどコントローラーとの接続長さがDefault位置より長くなります。
A250系モデルでエンクロージャーの背面パネルを左上に排気口があるようにした場合は最低でも1.5m必要です。これがA350になるとサイズが大きくなるためUSB-C延長ケーブルは2m程度必要になると思います。 2mの延長ケーブルでUSB-Cオスコネクタの長さが長いものを探すのはかなり難しいかもしれません。 日本で販売されているもので加工なしでできるケーブルは、ほぼありませんでした。 加工できるタイプの2mケーブルも見つけられなかったのでAliExpressでも探しましたが見つかりませんでした。
A250では雲長ケーブル1.5mでコントローラータッチパネルをエンクロージャーの上部に設置することができました。
I have designed a touch panel holder in Autodesk Fusion360. To use this touch panel holder, you must own a genuine Snapmaker 2.0 A250 or A350](including T and F models) enclosure.
The touch panel holder is installed on the frame at the top of the right side flank as viewed from the front of the enclosure. For those who have purchased the emergency stop button, the emergency stop button will be moved to the side and installed.
I have published two types of STL data (A250/A350) as 3D model data on my account on Thingiverse.
The way to create the model is to use Ultimaker Cura 5.0beta, enable gyroid support, and place the model horizontally. The molding material can be either PLA resin or ABS resin. If the correct molding method is used, no screw holes or other modifications are required, and the Gyroid support can be used simply by peeling off the Gyroid support.
For mounting to the top of the enclosure, use the M4 screws and M4 key slot nuts that are included with the Snapmaker 2.0 Emergency Button Module if you have purchased it. If you do not have an M4 key slot screw, you can put a large flat washer in the M4 screw, insert it into the groove of the aluminum frame, check if it is caught, and fix it with the M4 nut.
As for the USB-C extension cable, the length will depend on the A250 or A350 machine and the installation of the enclosure’s rear panel.
In my case, the rear panel of the enclosure on all three A250 machines is not in the Default position where the exhaust port is in the lower right corner as described in the Snapmaker manual, but the rear panel is changed back and forth so that the exhaust port is in the upper left corner. Therefore, the length of the communication cable, power cable, and other connections to the controller will be longer than in the Default position.
If the back panel of the enclosure is changed on the A250 series model so that the exhaust port is in the upper left corner, at least 1.5m is required. If this is the A350, the USB-C extension cable will need to be about 2m long due to its larger size. It may be quite difficult to find a 2m extension cable with a long USB-C male connector. There were almost no cables sold in Japan that could be done without processing. I couldn’t even find a 2m cable of the type that can be processed, so I looked on AliExpress but couldn’t find one.
With the A250, I was able to install the controller touch panel on top of the enclosure with a 1.5m cloud length cable.
Controller Touch Panelがあった全面パネルにカバーを取り付ける。
ホルダーを作成したことにより、全面パネルの右下に元々有ったタッチパネルの穴が開いてしまうため、穴をふさぐカバーを作成しました。
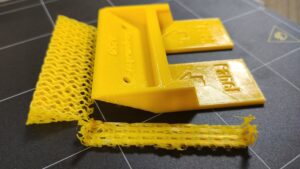
このカバーは単純なもので段差になっていますので両面テープなどを利用して全面パネルに張り付けることができます。 あまりにも単純なカバーになってしまうので、Snapmaker A250(A350)と文字をカバーパネルの前面にエンボス化しています。
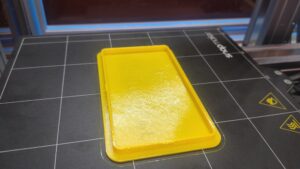 このカバーパネルの成型にはUltimaker Cura 5.0 betaを使用し、PLA樹脂またはABS樹脂で成形します。 成型にあたってUltimaker Curaの設定ではサポート設定は不要です。 パネルカバーの前面を下にして成型を行い、サポートなしで文字が凹み表示されます。
時間がなかったので寸法など細かいところはいい加減担ってしまってますが、カバー裏面に両面テープで貼り付けることでとりあえず使えてるのでこのまま公開したいと思います。
CNCやレーザー加工、ABS樹脂成型では臭いや排気熱、レーザーの焼成煙などを排気ファンで処理しますが、タッチパネルの大きな穴が空いたままだと排気ファンの意味をなさない状態になるため、タッチパネルのあった穴は塞いだほうが良いでしょう。 もう一ついえばSnapmakerのエンクロージャーの背面パネルにある排気穴はデフォルトの右下ではレーザー加工で発生した煙を排気してくれません。
パネルの位置を変え左上にすると配置する場所にもよりますが排気ダクトが邪魔にならなくなり、排気もスムーズに行われるのでおすすめです。
Since the original hole for the touch panel in the lower right corner of the full panel was opened by the creation of the holder, a cover was created to cover the hole.
This cover is simple and stepped, so it can be attached to the full panel using double-sided tape. Since the cover is so simple, we embossed the words Snapmaker A250 (A350) on the front of the cover panel.
The cover panel is molded using Ultimaker Cura 5.0 beta in PLA or ABS resin. No support settings are required in the Ultimaker Cura setup for molding. The panel cover is molded with the front of the panel cover down, and the letters appear recessed without support.
I didn’t have much time, so I have not been able to work out the details such as the dimensions, but I can use it for now by attaching it to the back of the cover with double-sided tape, so I would like to publish it as it is.
In CNC, laser processing, and ABS resin molding, exhaust fans are used to remove odors, exhaust heat, and smoke from the laser. Another thing to mention is that the exhaust holes on the back panel of the Snapmaker enclosure are not exhausting the smoke generated by the laser processing in the default lower right corner.
It is recommended that the panel be repositioned to the upper left corner so that the exhaust ducts are out of the way, depending on where the enclosure is placed, and the exhaust can be exhausted smoothly.
Controller Touch Panel Holder & Cover Panel 3Dデータ
今回紹介したタッチパネルホルダーとカバーパネルの3DモデルデータはThingiverseで公開していますので、そちらからダウンロードしてください。
The 3D model data of the touch panel holder and cover panel introduced here is available on Thingiverse, so please download it from there.
Thingiverse


紹介用の動画も作成してみました。
Snapmakerのマシンを割引購入できます!
Snapmakerを購入したいのであれば日本代理店経由ではなく、メーカー直販から購入したほうが価格的にも安く、最大のメリットはSnapmakerサポートに対して不具合対処をしてくれることです。
日本代理店購入1台とSnapmaker直販で購入した2台では、日本代理店でのサポートに渋られた内容がメーカー直販のSnapmakerサポートに連絡した場合、完全無償で代替品を送ってくれます。 英語でのやり取りとなりますが、翻訳ソフトで何とかなりますので、お勧めは直販サイトです。
購入決済にはクレジットカードまたはPayPalがおススメです。
購入履歴や問い合わせはSnapmakerのサイトからできますので心配不要です。
下記のリンクからクーポンを取得すると10%割引が可能です。
購入画面で決済処理前の確認画面で10%割引クーポン入力していただくことで決済金額から10%割引がなされます。
Snapmaker 10%割引コード: http://snapmaker.refr.cc/DiscountSales
Snapmaker Global Store(グローバルショップ):https://shop.snapmaker.com/
Snapmakerとは? 知らない人におすすめのモノ
Snapmakerはキックスターターで一躍知名度がアップし、初期モデルのSnapmaker 3-in-1 Originalが発売されました。 現在ではSnapmaker Ver.2のキックスターターがスタートし量産・出荷を開始しています。
このsnapmakerの良いところは主に以下の点で優れていることです。
- 筐体が金属製(アルミ合金)
- リニアステップモーターを使用したモジュールリニアレール
- 付属ソフトの優秀さはピカイチ
- 1台で3Dプリンタ・レーザー・CNCカービングの3種の加工ができる
- 加工精度が非常に高い。
- NC系の旋盤・マシニングなど経験がある人には更に奥深い加工ができる。
- 3つの機能がついて値段が安い。
- Snapmaker Ver2.0から加工サイズが違う3機種をリリース
- 後付けでオプションを追加できる(回転C軸など:リリース予定)
- 国内代理店が存在しメーカー保証・部品販売に問題がない。
安い3Dプリンタは加工精度が悪く、3Dプリンタとして出力にも影響するようなものが多々ありますが、このSnapmakerは非常に安定している加工機です。
興味がある人はSnapmaker 10%OFF クーポンコード:FRIEND-RLFQWLLでを利用して安く購入しましょう。
Snapmakerクーポン・オフィシャルサイトへどうぞ。
※10%クーポンは上記のオフィシャルサイト 製造直販のSnapmaker本社からの購入にのみ適用されます。
特売日にクーポンを利用して購入するとさらにお得になります。